Tuesday, August 22, 2017

Docker development workflow: Node, Express, Mongo

This post attempts to document the steps required to create a decent microservices development workflow using Docker & Docker-compose for a Nodejs, express application. The goal here is to make sure our development workflow is as seamless as possible.
Objectives
  1. Spin up a fully working version of our node, mongo microservice just by running docker-compose up
  2. Docker workflow should mimic what we are used to within a nodejs workflow using nodemon, webpack and webpack-dev-server. All changes instantly reflected in our app without any restarting of the docker containers
  3. Use data containers for initializing mongodb

Setup a simple express application and create a Dockerfile & docker-compose.yml file

Create a super simple node express application that listens on port 3000. The goal is to dockerize this application and create a development workflow using docker containers.
> mkdir docker-node-mongo
> cd docker-node-mongo
> npm init
> npm install --save express
> npm install --save nodemon
# create an app.js file with the following contents
var express = require('express');
var app = express();
app.get('/', function(req, res){
  res.send("Hello World");
});
app.listen(3000, function(){
  console.log('Example app listening on port 3000!');
});
# add the following to package.json scripts section
"scripts": {
    "start": "nodemon app.js"
  },
> npm start
Example app listening on port 3000!
# test
> curl -i http://localhost:3000/
At this point you should have a locally running node express application that responds with “Hello World” for http get requests.

Dockerizing the node express application

It is actually super simple to dockerize this application and run it in a docker container.
# create a file named Dockerfile
FROM node:argon
RUN mkdir /app
WORKDIR /app
COPY package.json /app
RUN npm install
COPY . /app
EXPOSE 3000
CMD ["npm", "start"]
To test this in a docker container we need to build this image & then run it.
> docker build -t node-test:0.1 .
The build step builds the image using the node:argon official node image and then copies the source into the image. This step only builds the image. Note:- the . at the indicates the current directory where Dockerfile is located
> docker run -p 3000:3000 -ti node-test:0.1
Example app listening on port 3000!
# test
> curl -i http://localhost:3000/
Hello world

Docker-compose to build and run the container and map host app directory into the container

This step uses docker-compose to orchestrate our containers. It is a super cool tool and allows to start all our dependencies with just one command “docker-compose up”
# create a docker-compose.yml file
version: "2"
services:
  web:
    build: .
    volumes:
      - ./:/app
    ports:
      - "3000:3000"
This file is building the image if not already present, mounts the host directory on the container in /app and starts the container. The end result is that with one command it will initialize and run our containers. Mounting host volumes has the added advantage of keeping development workflow the same as this running locally. But, the biggest benefit is now anyone can clone the github repository and run docker-compose up to get a clean development environment. Pretty neat!!
> docker-compose up

Build the mongo dependency into the express application

Add mongoose to the app “npm install — save mongoose” and connect the app to the mongo db.
var express = require(‘express’);
var app = express();
var mongoose = require(‘mongoose’);
//DB setup
mongoose.connect(“mongodb://mongo:27017”);
app.get(‘/’, function(req, res){
 res.send(“Hello World-changed-1 “);
});
app.listen(3000, function(){
 console.log(‘Example app listening on port 3000!’);
});
Add mongodb entry into the services section for the docker-compose file. The links tag allows to link services between containers. The ‘mongo’ service name is also added to the /etc/hosts in the container, allowing to access the service as such: mongodb://mongo:27017
version: “2”
 services:
  web:
   build: .
   volumes:
     — ./:/app
   ports:
   — “3000:3000”
   links:
    — mongo
   mongo:
    image: mongo
    ports:
      — “27017:27017”
Just running docker-compose up will start both the services, web & mongo.

Abstract data into data containers

The mongo data can be abstracted into a docker data container allowing for maximum portability. By doing this, multiple instances can share the same data container and also allows for easy backup and restore functionality.
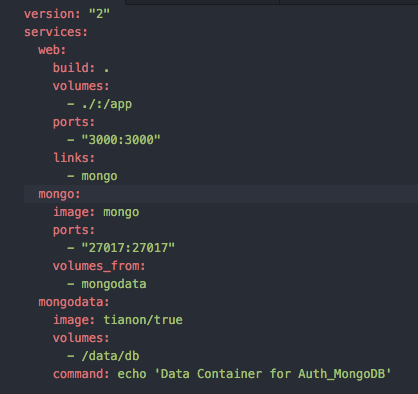
Create a new service called mongodata and using volumes_from will allow the mongo database container instance to share the /data/db mounted volume across containers.

Sunday, August 31, 2014

Meteor Creating Package Errors & how to fix them (Template Not Defined & Cannot Set Property)

Meteor in August 2014 moved from meteorite packaging towards supporting a built in package management as part of the core framework. As of this writing, Meteor is at v0.9.0.1.

I was in the process of creating a package for meteor and encountered a couple of errors. It was not easy to find answers so I thought i would post them here:

Error 1: Uncaught ReferenceError: Template is not defined
              Exception from Deps recompute function: Error: No such template:

Adding the following in package.js solved the error for me:

package.js:
    api.use(['templating'],'client');


Error 2: Uncaught TypeError: Cannot set property 'rendered' of undefined ez-menu.js:2
Exception from Deps recompute function: Error: No such template:

This error was tricky to find and i did a lot of google-fu to figure out what was going wrong. Since i solved the first error, i knew the Template was defined now. But, why would the rendered function not be available. Why was the template coming back as undefined???

The silliness was the order of operations in package.js.. 
  • Make sure you add the HTML file before any CSS or JS files
  1.  api.addFiles('easy-side-menu.html', 'client');
  2.  api.addFiles(['easy-side-menu.js', 'slideout-menu.css'], 'client'); 


Monday, April 28, 2014

Miscellaneous Responsive Meteor Development tips

Tip 1: On the iphone the responsive bootstrap forms zoom in when you enter text. If the input item (select, textarea & text) size is less than 16px, it zooms in to let user enter the text. But, it does not snap back after. This causes all sorts of problems when you change orientation.

The simple CSS fix for this was proposed by Christina Arasmo Beymer in SO. 
http://stackoverflow.com/questions/2989263/disable-auto-zoom-in-input-text-tag-safari-on-iphone/16255670#16255670

/*
  Disable auto zoom for iOS forms, which causes responsive issues
  on the phones
 */
 @media screen and (-webkit-min-device-pixel-ratio:0) {
 select:focus, textarea:focus, input:focus {
 font-size: 16px;
 background:#eee;
  }
 }


Tip 2: How do you test for iphone form factor when chrome does not allow you to reduce the width to less than 420px?? This nifty trick was proposed somewhere on the internets, but i am unable to find a reference to attribute.

    Dock the Google Inspector Tool to the right side of the screen, by holding the dock button down for a couple of seconds. It should show the Dock Right option.

Here is my iPhone-5 test bench which works very well:


Sunday, April 27, 2014

Meteor project with bootstrap-3

Recently have been dabbling in learning Meteor and doing a quick and dirty project to get my meteorjs development skills up to speed.

Check out the recently uploaded/deployed project:

http://devicebox.meteor.com

The code is in github if you are so inclined to clone the repository...

https://github.com/sunkay/device-safe.git

A great book to learn meteor is discover.meteor.com I personally found this book to be invaluable in jump starting learning the framework and some of its intricacies.

What I like most about Meteor (Meteorjs) framework:

  1. End to End framework to develop application quickly
  2. Integrated mongodb collections which are reactive
  3. Reactive Templates which automatically update when the underlying data changes
  4. Data Syncronization between the front-end and backend. The collection & template integration makes this very clean and powerful
  5. Latency Compensation - This is pretty cool, but I am still trying to figure out the performance characteristics of this...
I like developing in meteorjs framework so far. I have dabbled in Angularjs and looking back, I find developing in angularjs horrendous. The dependency injection model looks cool at first, but the code to accomplish it is absolutely effing complicated. 


Sunday, January 19, 2014

Lesson 7: Angularjs/Nodejs/MongoDB Tutorial: Hooking up Node REST server to mongoDB using mongoose

In Lesson 6, we created unit test specs for both our client and server. So far, we have a fully working and tested CRUD for devices. But, the server is still using a static javascript array to hold the list of devices. Its now time to refactor our server side code and hook it up to mongodb using mongoose framework. Since we have good tests, we should feel comfortable in refactoring the code base.

Installing and starting mongodb

  1. brew update
  2. brew install mongodb
  3. mongod&

STOPPED DEVELOPMENT OF THIS IN ANGULAR. Currently, I am developing in Meteorjs framework and its a completely refreshing way to build fully functional websites. Check out the new post regarding meteor.

Meteorjs is way better than Angularjs

After going through the AngularJS tutorials and working through the Device Management app, I decided to redo the example app in Meteor framework. What a refreshing change.... I dabbled in Meteorjs when it was v.0.3 and found that it was not mature enough. A year later, it has significantly improved and the current version meteor 0.7.0.1 is pretty robust. There are also some excellent books & tutorials that help decrease the learning curve significantly on Meteor.

Angularjs on the other hand is still as cumbersome as ever. Once you get past the cool templating schemes of angular, writing even a small application takes an inordinate amount of time. Documentation is severely lacking and the dependency injection constructs get so messy that it hurts my eyes to look at them.

Compare the following to add a device:
-----

-----

Meteor is extremely well integrated full-stack web development solution from front to back. Client side templating, packaging, accounts-ui, caching, reactive response. Server side database integration, reactive & collections.

Meteor collections takes care of both the client and server side code, has a pretty clean model for templating and the meteor packages are a god send. Meteor accounts-ui package provides an out of the box secure authentication model with integration with various provides like google, facebook, github etc. All with 3 lines of code.

Everyone's mileage will vary, but for me Meteor is a very refreshing fullstack web development environment. Its easy to learn, fun to develop in and is being actively worked on by some of the smartest people in the industry. Looks like the roadmap is solid and is being executed on.

If you want to view the device management app in Meteor checkout https://github.com/sunkay/device-safe

If you want to view the same app written in Angular checkout: https://github.com/sunkay/cotd


Saturday, June 29, 2013

Lesson 6: Angularjs Tutorial: Testing using ngMock $httpBackend and karma. Node REST testing with Mocha

In Lesson 5, we implemented a node REST server to perform CRUD operations for device data. We have not yet hooked our server to mongodb, we will do that once we completely understand and unit test existing code base. This is all about Testing, Testing & more Testing. Client side testing using Karma & Server Side Node.js REST API testing using Mocha

Our existing unit test cases handle static data being returned by the services. Since we have refactored our code to use $resource & $http, our unit test cases need to be refactored to utilize _$httpBackend_ which is a mock API provided by angularjs. Understanding $httpBackend takes a while and getting used to. The general steps in testing controllers using httpBackend are:

1. Inject _$httpBackend_
2. Use expectGet, expectPOST & expectPUT & respond API to implement mock backend behavior
3. Run methods under test & verify results
4. _$httpBackend_.flush() to flush pending requests on demand

Testing Controllers

Injecting _$httpBackend_ into the tests:


  it('listDeviceController check for devices in the model',
    inject(function(_$httpBackend_, $rootScope, $controller, Devices) {
        var scope = $rootScope.$new();
        var mockBackend = _$httpBackend_;

Implementing Mock Backend behavior:


        mockBackend.expectGET('http://localhost:3000/devices').
          respond([{id:0, name: "iphone", assetTag:"a23456", owner:"dev", desc:"iOS4.2"}]);

expectGET specifies the request expectation & respond implements the mock response

Run methods under test 

 controllerSpec.js: var ctrl = $controller('deviceListController', {$scope: scope}, Devices);

This creates the deviceListController. In the controller the following statement "$scope.devices = Devices.query()" does a query using the Devices service. Essentially, it makes a http GET request. This is intercepted by the ngMock angularjs module & its response is provided to the controller. 

Flush the response manually

        mockBackend.flush();  

Test the conditions

        expect(scope.devices).toEqualData([{id:0, name: "iphone", assetTag:"a23456", owner:"dev", desc:"iOS4.2"}]);

Here is the code for controller CRUD testing with ngMock httpBackend:
--
--

Testing Services

Testing services is fairly straightforward. We are mainly ensuring that the services send the right http requests to the backend & expect the right responses. 

--
--

Trouble-shooting:


Error: Unknown provider: $resourceProvider <- devices="" div="" resource="">

  ngResource is not part of angularjs core. So, you have to include it specifically in your test specs, like so: 

describe('service', function() {
  beforeEach(function(){
    module('cotd.services');
    module('ngResource');
  });

Testing the server - Node REST service testing using Mocha, Chai & supertest

Now that we have extensively implemented client side unit testing specs, the focus naturally turns to testing the server side. After reviewing a bunch of server side testing frameworks, i think Mocha provides for a better suite since it allows for BDD a.k.a jasmine style syntax. This allows us to keep the testing constructs fairly consistent between client & server. Lets implement hands on mocha testing for our server.

We can accomplish Server side REST based testing easily by combining 3 frameworks Mocha, Chai & SuperTest. They play well nicely and makes it easier to write Node Based REST tests. 

Step 1: is to add mocha, Chai & supertest to package.json
{
  "name": "cotd-server",
  "description": "cotd backend",
  "version": "0.0.1",
  "private": "true",
  "dependencies": {
    "express": "3.2.2",
    "cors": "*"
  },
  "devDependencies":{
    "mocha": "*",
    "chai": "*",
    "supertest": "*"
  },
  "scripts":{
     "test": "mocha"
  }
}

Step 2: export the express app as a module in server.js. This is for Mocha to test the server functionality without running the server first.

module.exports = app; 

Step 3: create a test directory in your server folder and Create a new file for the test spec called test-devicesRest.js. Require mocha, chai & supertest in your test spec.

var chai = require('chai'),
    express = require('express'),
    request = require('supertest');

var app = require('../server');

var expect = chai.expect;

Step 4: writing a GET test

describe('GET /devices', function(){
    it('should return 200 and JSON with valid keys', function(done){
        request(app)
        .get('/devices')
        .end(function(err, res){
            //validate the keys in the response JSON matches, we dont care about the values
            expect(res.status).to.equal(200);
            expect(res.body[0]).to.have.keys(['id', 'name', 'assetTag', 'owner', 'desc']);
            done();
        });
    });  
});

Step 5: creating a simple Makefile to run our test using Mocha. running make test on the command line should run mocha. It looks for the test directory and executes test specs within it.

REPORTER = list
#REPORTER = dot

test:
@./node_modules/.bin/mocha \
--reporter $(REPORTER)

test-w:
@./node_modules/.bin/mocha \
--reporter $(REPORTER) \
--growl \
--watch


.PHONY: test

Step 6: Write other tests. Here is a complete source code for our REST tests
--

--

git tag

git checkout v1.6


Sunday, June 16, 2013

Lesson 5: Angularjs Tutorial: Backend - Node Express Mongodb Angularjs integration ($http, deferred promises with $q, $resource)

In Lesson 4 we wrapped up our device management CRUD in angularjs with both unit tests and end to end tests. We also organized our project structure with angularjs seed. So far, we have been using static data stored in an array within our Devices Service. In this lesson we will create a REST based Node/MongoDB backend which can persist our data.

Here are the stories we will work in Part-1 (Mongo integration will be Part-2):

  1. Create an node-express server application which will return the list of devices in JSON format (Read)
  2. Server returns a single device info given an ID
  3. Server updates devices information
  4. Server deletes a particular device 
  5. Modify the angularjs application Service module to communicate with the server

Create an node-express server application which will return the list of devices in JSON format (Read) & which returns a single device information

  • cd ~/angular/cotd
  • mkdir server
  • Create a file called package.json in the server folder to define our dependencies
{
  "name": "cotd-server",
  "description": "cotd backend",
  "version": "0.0.1",
  "private": "true",
  "dependencies": {
    "express": "3.2.2"
  }
}
  • npm install -- this will install express in the node_modules directory
Lets create the server application using node & express. We will create a GET route which will return a list of devices. 

Code for server.js which returns a list of devices:


Run using node server.js; Test by going to localhost:3000/devices

Lets refactor our server code into node modules, which will help us later as the project becomes more complex. Create a sub-folder called routes & a new file called devices.js

Code for module devices.js


Refactored server.js

Add Device

We add a device using the POST method to send the JSON data. Add the following route to server:

In Server.js add:

app.configure(function () {
    app.use(express.bodyParser());
});

app.post('/devices', devices.add);          // add new device

In the devices module (devices.js):

exports.add = function(req,res){
    var dev = req.body;
    devices.push(dev);
    console.log(devices);
    res.send([{status: '1'}]);
};

You can test this using curl in the terminal or by using a chrome extension called POSTMAN:

curl -i -X POST -H 'Contet-Type: application/json' -d '{"id":7, "name": "iphone", "assetTag":"a23456", "owner":"dev", "desc":"iOS4.2"}' http://localhost:3000/devices

Implement update & deletion of a particular device 

Deleting should be simple to achieve. It involves removing the JSON object from our devices array. Using the javascript array's filter api is fairly easy & straightforward. (Note: the filter is newer ecma standard and is not supported ie-8 and below, although the API document provides a work-around if you need it)

server.js - add delete route


app.delete('/devices/:id', devices.delete); // delete

devices.js -- node module

exports.delete = function(req, res){
    var id = req.params.id;
    devices = devices.filter(function(item){
        return item.id != id;
    });
    console.log("DELETED \n");
    console.log(devices);
    res.send([{status: '1'}]);
};

TEST: curl -i -X DELETE -H 'Conent-Type: application/json' http://localhost:3000/devices/6

Updating is also fairly straightforward to achieve in a similar manner, add the following in server.js
app.put('/devices/:id', devices.update);    // update

devices.js
exports.update = function(req, res){
    // get the device
    var id = req.params.id;
    var dev = req.body;
    if(id != dev.id){
        console.log("id's do not match for update");
        res.send([{status: '0'}]);
    }
    console.log(dev);

    // find the selected device & update
    devices.forEach(function(item, i){
        if(item.id == id){
            // update           
            devices[i] = dev; 
            res.send([{status: '1'}]);
            return;
        }
    });
    res.send([{status: '0'}]);
};

TEST: curl -i -XPUT -H 'Content-Type: application/json' -d '{"id":6, "name": "testupdateiphone", "assetTag":"a23456", "owner":"dev", "desc":"iOS4.2"}' http://localhost:3000/devices/6

Lets check how we are doing with our stories: (git checkout v1.4.1)


  1. DONE - Create an node-express server application which will return the list of devices in JSON format (Read)
  2. DONE - Server returns a single device info given an ID
  3. DONE - Server updates devices information
  4. DONE - Server deletes a particular device 
  5. Modify the angularjs application Service module to communicate with the server
  6. Modify the unit & e2e test cases to use Mock data 

Modify the angularjs application Service module to communicate with the server using $http & $ngResource

Angularjs provides the $http service which provides a pretty comprehensive API to handle HTTP requests. More info can be found here. Lets modify our angular app service to get the data from the express backend server we created above.

Add this to app/service.js file. This just makes the HTTP call for now.

    items.query = function(){
        var promise = $http.get('http://localhost:3000/devices')
        .success(function(d){
            console.log(d);
        })
        .error(function(d, status){
            console.log("error getting data from server: " + status);
        });
    }

We will get the following common error on certain strict browsers like chrome:

XMLHttpRequest cannot load http://localhost:3000/devices. Origin http://localhost:8000 is not allowed by Access-Control-Allow-Origin.

CORS Background

This is because for security browsers do not allow request to a different domain, even though it is the same domain but a different port. The browsers are enforcing the same origin policy. CORS (Cross Origin Resource Sharing) "The CORS standard works by adding new HTTP headers that allow servers to serve resources to permitted origin domains." There are many options to handle same origin policy & CORS is one way to do it. The other is to configure a reverse proxy.

To make our client side app be able to call the backend REST server the CORS header must be present which will tell the browser that this request is in good order. http://enable-cors.org/index.html

The following HTTP header needs to be added by the server to its response.

Access-Control-Allow-Origin: *

CORS References:
http://www.html5rocks.com/en/tutorials/cors/
http://stackoverflow.com/questions/7067966/how-to-allow-cors-in-express-nodejs

We will be using the node-cors package which will allow us to configure and handle the CORS header in our express server application. node-CORS is a node.js package for providing a connect/express middleware that can be used to enable CORS with various options.

Add the following in server/package.json:
"dependencies": {
    "express": "3.2.2",
    "cors": "*"
  }

Modify the server to utilize cors package (server.js):


var express = require('express'),
    cors = require('cors'),
    devices = require('./routes/devices.js');

var app = express();

app.configure(function () {
    app.use(express.bodyParser());
    app.use(cors());
});

Lets modify the query method in our service to utilize deferred promises to get data from the backend. Here is the code which does that:


    items.query = function(){
        var deferred = $q.defer();

        var url = "http://localhost:3000/devices";

        $http.get(url).success(function(data, status){
            deferred.resolve(data);  
        })
        .error(function(data, status){
            console.log("error getting data from server: " + status);
            deferred.reject(data);
        });

        return deferred.promise;
    }


Test it using http://localhost:8000/app/index.html#/ & the device list should be working at this point.

Using ngResource ($resource)

Instead of utilizing the lower level $http service, angular provides the $resource abstraction for interacting with JSON REST services. Lets use that to see how it helps alleviate all the boilerplate code we have to write if we have to use the lower level $http service. 

ngResource API documentation provides details around the usage of this angular service. To use this we need to include the angular-resource.js within our app.

index.html (add the following)


  script src="lib/angular/angular-resource.js"


app.js (add to include the dependency)

angular.module('cotd', ['cotd.filters', 'cotd.services', 
                        'cotd.directives', 'cotd.controllers', 'ngResource']).

Using ngResource simplifies our service module significantly, since it provides a wrapper around the common REST functionality. Query, Save, Delete & Update functionalities are provided out of the box. We can replace all our previous code with 3 lines like so:

services.js (modify to include $resource)


 .factory('Devices', ['$resource', function($resource){
    return $resource('http://localhost\\:3000/devices/:deviceId',
        {},
        {update: {method:'PUT'}, isArray:false}
        );
  }]);

This resource definition gives the ability to interact with the RESTful server-side data source.

Within the controllers, you can call either the Devices "class" methods or the "instance" methods. The structure is typically:

Resource.query({params}, function success(){}, function error(){});

Refactored controller code is shown below, which performs all the CRUD operations:

--

--

Minor refactoring on the node server is shown here:

server.js

//Devices CRUD
app.get('/devices', devices.findAll);       // list
app.get('/devices/:id', devices.findById);  // find
app.post('/devices', devices.add);          // add new device
app.put('/devices/:id', devices.update);    // update
app.delete('/devices/:id', devices.delete); // delete

devices.js (module)
--

--

git checkout v1.5.0

Saturday, May 4, 2013

Lesson 4: Angularjs Tutorial: Testing and Project Structure

In Lesson 3 we finished our device management CRUD in angularjs. We used template bindings, controllers, modules and forms to come up with an effective CRUD model. But we have not written any tests yet. Angularjs comes with a pretty solid foundation to support Test Driven Development (TDD) and allows us to do unit testing as well as end to end testing. In this section, lets take a step back, learn about how to write effective tests for angularjs. We should also organize our project structure which will enable us to write complex applications in a modular way.

Project Structure and using the Angular Seed


First lets tackle the subject of Project Structure for angularjs applications. I think the easy thing would be to use one of the project seeds made available by the core project team. This is available at https://github.com/angular/angular-seed.

1. Clone angular-seed into a separate directory and not your working directory
  • cd ~/angular
  • git clone https://github.com/angular/angular-seed
2. Create a new branch in our existing git repo so that we can do this work independently and later merge into our main branch
  • cd ~/angular/cotd
  • git branch seed_refactor - create a branch called seed_refactor to do our work locally
  • git checkout seed_refactor - change to point to the newly created branch
  • git branch - this shows which branch we are on
3. Lets create and slowly make the seed directory structure into our project. For new projects its better to start with the seed straight away or better yet use Yeoman (we'll get into that later)
  • cd ~/angular/cotd
  • mkdir config  -- create the config directory. Mainly holds karma test configs


  • cp ~/angular/angular-seed/config/* ./config/.
  • ls config
  • mkdir logs
  • mkdir test
  • cp -fr ~/angular/angular-seed/test/ ./test/.
  • cp -fr ~/angular/angular-seed/scripts .
  • cp -fr ~/angular/angular-seed/app .

  • 4. Modify the seed app (manually modifying the app is good because it will allow us to know the structure intimately, before proceeding to add more items)
    • modify index.html, instead of copying it. main.html is fairly simple in our case so should be easy to modify
      • change app name ng-app = 'cotd'
      • change title
      • add bootstrap css  
      • remove anything that we dont need
    • We will replace cotd.js with various components within the seed structure
      • routes should go in app.js
      • refactor controllers into the controller structure provided by the seed package
      • refactor the service into the services file
    Version Tag 1.3.2 should contain the refactored code which is working. To get this into your directory do the following:

    • cd ~/angular/cotd
    • git checkout 1.3.2
    We are now done refactoring our original application folder to using the angular-seed project structure. This offers a lot of advantages, all of the testacular/Karma configurations are already setup for us, it also has scrips that allow us to run the web server and test runners. Lots of good in angular-seed. 

    Testing

    Angularjs has been designed to allow us to effectively do TDD. It allows us to do both unit testing as well as end-to-end testing. Currently our project does not have any tests... we will rectify that shortly. Here is our plan:
    1. Write unit tests to test the functionality of the Device Service
    2. Write unit tests for the controllers
    3. Write end-to-end unit tests
    Angular seed makes it easy for us to write and execute tests. We will be using the Karma (a.k.a testacular) testing integration provided with the seed to help us quickly write tests & let the seed configuration & scripts take care of executing them. 

    To run the unit tests type at the prompt: ./scripts/test.sh

    This opens a browser window & all the files will be watched. Any changes you make will run all the tests. This significantly improves our workflow and allows to achieve TDD. The debug console should allow you to see the test results. 

    Testing Services

    Lets start by writing a simple test. Our first test is to ensure that our Device Service should exist. We will be using jasmine to describe our tests & write expectations of behavior. Our simple test is listed below: The test/unit/serviceSpec.js file already sets up the module in beforeEach so its available later. 

    describe('service', function() {
      beforeEach(module('cotd.services'));

      describe('Devices', function() {
        it('should exist', inject(function(Devices){
            expect(Devices).not.toBe(null);
        })); // it

      }); // Devices

    }); // service

    You can test this by running ~/angular/cotd/scripts/test.sh. Keep the browser window open. Any additional changes you make to the app or tests will be watched and all tests immediately run. This workflow allows us to do continuous TDD. 

    We can start to add additional tests for the service. Lets add a test to see if our query functionality is working as expected. Inject the Device service & expect the data lenght to be equal to 7:

        it('should contain devices', inject(function(Devices) {
          expect(Devices.query().length).toEqual(7);
        }));

    Similarly, we can add unit tests for both Add & Update functionality within the services.

    Add unit-test:

        it('should add a device correctly', inject(function(Devices) {
            var item = {id:7, name: "iphone", assetTag:"a23456", owner:"dev", desc:"iOS4.2"};
            Devices.add(item)
          expect(Devices.query().length).toEqual(8);
        }));

    Update unit-test:

        it('should update a device correctly', inject(function(Devices) {
            // modified device name test
            var item = {id:0, name: "iphone-test", assetTag:"a23456", owner:"dev", desc:"iOS4.2"};
            Devices.update(item)
            expect(Devices.query().length).toEqual(7);
            //get first item
            expect(Devices.query()[0].name).toEqual("iphone-test");
        }));

    As you can see, testing services is fairly straightforward since we have the data in the service stored statically. Once we refactor our code to retrieve data from the backend, we need to refactor these test cases to handle those cases. 

    Testing Controllers

    Angularjs makes testing controllers pretty straightforward too, once you understand certain basic concepts. Define modules for both services & controllers so that they are available for this spec:


    describe('controllers', function(){
      beforeEach(function(){
        module('cotd.controllers');
        module('cotd.services');
      });

    The first unit test case is to make sure the controller scope has the right number of devices. Remember, the scope is bound in the template, so verifying that it is accurate is a good idea:


     it('listDeviceController should have 6 devices in the model',
        inject(function($rootScope, $controller, Devices) {
            var scope = $rootScope.$new();
            var ctrl = $controller('deviceListController', {$scope: scope}, Devices);
            // check the number of devices
            expect(scope.devices.length).toEqual(7);
      }));

    Unit test for Adding a device & verifying that the scope accounts for the add:

      it('addDeviceController should have 8 devices in the model after add',
        inject(function($rootScope, $controller, $location, Devices) {
            var scope = $rootScope.$new();
            var ctrl = $controller('addDeviceController', {$scope: scope}, $location, Devices);
            var item = {id:7, name: "iphone", assetTag:"a23456", owner:"dev", desc:"iOS4.2"};

            scope.add(item);
            // make sure the flag is true
            expect(scope.add).toBeTruthy();
            // check actual add effected the devices list
            expect(Devices.query().length).toEqual(8);
      }));

    Lets test the edit functionality too:

      it('editDeviceController should successfully edit devices in the model',
        inject(function($rootScope, $controller, $location, $routeParams, Devices) {
            var scope = $rootScope.$new();
            var ctrl = $controller('editDeviceController', {$scope: scope}, $routeParams, $location, Devices);
            var item = {id:0, name: "iphone", assetTag:"a23456", owner:"qa", desc:"iOS4.3"};
            // testing for update flag
            expect(scope.add).toBeFalsy();
            // confirm original lenght
            expect(Devices.query().length).toEqual(7);
            // confirm description
            expect(Devices.query()[0].desc).toEqual('iOS4.2');
            // update
            scope.update(item);
            // validate update
            expect(Devices.query()[0].desc).toEqual('iOS4.3');
            expect(Devices.query()[0].owner).toEqual('qa');
      }));

    Writing End To End Tests

    Writing and executing End to End (e2e) tests is a powerful mechanism that angularjs provides which is extremely valuable for large-scale applications. Angular consructs uses jquery and matchers to help us write pretty quick e2e tests. The Karma runner also makes it easy to run the tests in multiple browsers. 

    E2E tests starts the browser and uses that as a client which has an added advantage from other unit testing frameworks. 

    describe('my app', function() {

      beforeEach(function() {
        browser().navigateTo('../../app/index.html');
      });

      it('should automatically redirect to / when location hash/fragment is empty', function() {
        expect(browser().location().url()).toBe("/");
      });


      describe('DisplayList', function() {

        beforeEach(function() {
          browser().navigateTo('#/');
        });

    This E2E test allows navigates to the displayDevices page and can use jquery DOM matching to test for specific conditions. For example, below, it tests for item.owner column in the table. 

        it('should render DisplayDevices when user navigates to /#', function() {
          expect(element('[ng-view] a').text()).
            toMatch(/Would you like to add a new device/);
          
          expect(element('[ng-view] th').text()).
            toMatch(/Name/);

          // counting number of rows
          expect(repeater('tbody tr').count()).toBe(7);

          // matching the resulting elements in a column
          expect(repeater('tbody tr').column("item.owner"))
            .toEqual(["dev","dev","qa","dev","dev","qa","dev"]);
        });

        // clicking one item in the table using :eq(0)
        it("clicking remove link should remove device", function(){
          element('tbody tr:eq(0) .icon-trash').click();
          expect(repeater('tbody tr').count()).toBe(6);
        });

        // clicking a link should take you to add device URL, selection by id
        it("clicking add Device link should take you to right screen", function(){
          element('#addlink').click();
          expect(browser().location().url()).toBe('/add');
        });    

      });

    Here is the snippet to do E2E test for adding a new device:

        // test for Add & subsequent expectation that the devices list has the added value
        it('should add a Device when user enters values and submits them', function() {
          input('device.name').enter('TestName');
          input('device.assetTag').enter('TestAssetTag');
          input('device.owner').enter('TestOwner');
          input('device.desc').enter('TestDescription');
          element('#addDevice').click();

          // counting number of rows
          expect(repeater('tbody tr').count()).toBe(8);

          // matching the resulting elements in a column
          expect(repeater('tbody tr').column("item.owner"))
            .toEqual(["dev","dev","qa","dev","dev","qa","dev", "TestOwner"]);
        }); 


    Here is the test snippet for modifying & testing the modified element. We are navigating to the first record "#/edit/0' using the browser control. Then we use a very similar pattern to enter values and test the result. 

      describe('updateDeviceView', function() {

        beforeEach(function() {
          browser().navigateTo('#/edit/0');
        });

        // test for update & subsequent expectation that the devices list has the updated value
        it('should update a Device when user enters values and submits them', function() {
          input('device.name').enter('TestName');
          input('device.assetTag').enter('TestAssetTag');
          input('device.owner').enter('TestOwner');
          input('device.desc').enter('TestDescription');
          element('#updateDevice').click();

          // counting number of rows
          expect(repeater('tbody tr').count()).toBe(7);

          // matching the resulting elements in a column
          expect(repeater('tbody tr').column("item.owner"))
            .toEqual(["TestOwner","dev","qa","dev","dev","qa","dev"]);
        }); 

      });

    With this we complete our testing. We refactored our code base using angular-seed which helps us tremendously to organize our code & provides a full functional workflow environment to do TDD. To download the latest code, you can checkout the following version from git. 

    git checkout v1.4

    Next up is to retrieve the data from an external REST based backend. We will build a Node Express Mongo backend which integrates with our angularjs frontend. 


    Thursday, April 25, 2013

    Lesson 3: Angular Tutorial and Journey - Forms & CRUD

    In Lesson 2 we created a basic structure for our Device Management application. We learned the following:
    1. How to modularize our application using Angular Modules & we created an angular Service which can encapsulate our backend device data. This service can later be extended to retrieve data from the backend services
    2. How to handle different views within the application using Angular Routes. We were able to split our main HTML template into multiple views and assemble at runtime using $routeProvider. We injected the controller and views to the route. 
    3. We setup nginx server to start serving our application behind a webserver
    4. Most importantly, we are also learning how to effectively use github and git

    During this part of the journey, lets try to manage our device list. Currently, we have a static list which is stored as an array within a service module. I would like to handle this in a couple of steps... progressively.. [ You can access all the code in this lesson by doing git checkout v1.3.1]

    1. When there are no items in the list, it should display "You have no devices, would you like to add one". This will provide an entry point into adding a device. 
    2. Implement a form which will add a device to our list (although not persisted in a db at this time)
    Step 1: Show/Hide a message using ng-show & ng-hide. Angular templating language does not have an if-else conditional keywords. This is mainly due to the fact that angular uses DOM as its templating engine. But ng-show, ng-hide & ng-switch provide a mechanism to do conditional logic. 

    In our app, we want to show the message "You have no devices setup. Would you like to add?" at the right time.

    Here is simple code addition to do that: (Note:- we will eliminate the need for this later. This is to just show the use of directives ng-hide & ng-show for conditional logic)


    Step 2:
    This is a bit more involved. If we want to add a form, we have to do a couple of things. First we need to create a HTML partial template, lets call it addDevice.html which will hold our form, then add a .RouteProvider to handle the URL (http://localhost/cotd/#/add), then we need to create a addDevice controller which take the model & insert it into our in memory database.

    Here is a simple bootstrap template which just shows the form or angularjs partial. It does nothing at the moment. It uses class control-group, control-label & controls to make sure the forms are all aligned properly. One issue that tripped me was that if I did not have "!DOCTYPE html" in my main.html file, the bootstrap forms text input field width was smaller 18px. Once i added then doctype the sizes looked great.


    Now lets add angular model hooks. Angular makes it easy to bind form data into our model. Just by adding ng-model into the input fields, these are now available in $scope within our controllers. This reduces a significant amount of coding, in my opinion. In the gist below, I show the form with the model hooks. Pretty simple way to bind input data so its available in our controller.


    Now lets take a look at the controller. The goal here is to take the device and add it to our list. The first neat thing is that "device" javascript object is available to us in the controller with all the data filled in. You can log to the console to see whats in there.

    It does not have the id element, so we need to add it, which we will do once I explain how in angularjs the data can being shared between controllers using services.

    As we talked about before, Services in Angularjs allows us to encapsulate common functionality within the app, its a singleton so you know there is only one instantiation of it. We can also inject this into multiple controllers.

    I did a little refactoring of our original service. First, I moved the data into a data property, then we add a method called query, which just returns the data, and also create an add function, which will push the newly added data into the array object.

    The following gist shows the shared service code:


    To wrap up, lets look at our controllers. We have 2 controllers, list & add. They are both injected with $scope & "Devices" shared angularjs service. The angularjs service encapsulates the data model.

    One last thing we need to do is to figure out how to get back to the DeviceListing page once we are done adding. We can use the angularjs $location.path construct to redirect to the main page.

    Update

    For updating device information we can reuse the addDevice.html template. The request flow goes like this a) user selects item to edit from the list b) which sends a request in the format #/edit/:id which will be interpreted by the routeProvider & handed over to the editDeviceController which displays the device information c) on edit we update the deviceInfo using our Devices service abstraction. Lets take it one step at a time

    Step 1: Reusing addDevice.html template, we will add a new Edit button. We need to hide the add button & show the edit button. Also, when adding a device, we need to show Add & hide Edit. Lets do this using the ng-show & ng-hide directives. Lets bind this using an addFlag variable attached to our scope. This should toggle Add & Edit buttons depending on the controller. 

    AddDevice.html


    function addDeviceController($scope, $location, Devices)
    {
        $scope.add=true;


    function editDeviceController($scope, $location, $routeParams, Devices)
    {
        $scope.add=false;

    Lets add a route for handling edit and inject the editDeviceController & addDevice.html template.


        when('/edit/:id', {
            controller: editDeviceController,
            templateUrl: 'addDevice.html'
        }).


    Lets now implement the editDeviceController. We need to do the following, based on the :id parameter, we get the device from the list & inject into $scope so that 2-way binding takes care of displaying the data in the template. Its important that we need to deep copy the device object into Scope, otherwise you will undefined error at runtime. Lets also add an update function which will be triggred when the user clicks on Edit.


    Full implementation of the Edit Controller:
    function editDeviceController($scope, $location, $routeParams, Devices)
    {
        // get the device based on parameter id
        var device = Devices.query()[$routeParams.id];

        // set the add/edit flag
        $scope.add=false;
     
        // deep copies the selected item into scope
        $scope.device = angular.copy(device);

        $scope.update = function(device){
            if(!device) return;
            console.log("in EditCtrl add");

            Devices.update(device);

            // redirect to main screen
            $location.path('#/');
        }
    }


    Lets take a look at the update functionality within our Service. In this simple case, we just update an array. We will extend the service in later lessons to communicate with a restful backend. But, it solves our purposes.


        items.update = function(device){
            // find the selected device & update
            items.data.forEach(function(item, i){
                if(item.id == device.id){
                    // update              
                    items.data[i] = device;
                    return;
                }
            });
        }


    Conclusion


    I am truly amazed at all the functionality that angularjs provides. The amount of code required to accomplish this is very low and that is the promise of angularjs.

    So, we completed the following within our Angularjs CRUD model:
    1. Create - Add Device is fully functional now
    2. Read - List Device is fully functional
    3 Update - Next Up
    4. Delete - Fully functional

    Sunday, April 21, 2013

    Lesson 2: Angular Tutorial and Journey - Introducing Modules, Services & Routes

    We will be building on Lesson-1 during this tutorial. We learned the following:
    1. Using Git, clone the app & get checkout a version using "git checkout v1.0"
    2. We created a very simple app which displays a list of devices
    3. The list of devices is stored in a simple js array for the moment
    4. We are using bootstrap to prettify the display
    5. We created a simple angular 2-way binding between Model ($scope) & the view. We also created a simple controller which fills our model
    This lesson we will start with extending the basic app & making it more modular. You can write the full  angular app in one javascript file & a single HTML file. But that will not be good right... So, angular provides some good mechanisms for us to organize our code better. 

    Modules & Services

    Angular modules provide a mechanism to create services that our app utilizes. Essentially we can group common functionality within modules & then it can be utilized anywhere within the app. We will first create a service module which will move the static list of devices from the controller to a service. 

    We will create a simple DeviceModule which will abstract our list of devices. The following Gist shows how to do it following the module definition paradigm that angularjs prescribes.

    • Create new file called deviceService.js
    • Define 'DeviceModule' as an angular module using angular.module('DeviceModule', []);
    • Factory provides a singleton module that we can utilize within our app & provides the list of devices that we can use in our Model. 

    Gist -->  Angular DeviceModule

    Routes


    Routes provide a mechanism which will help organize our project even better and also allows us to create multi-page views.

    NOTE:- ROUTES will require setting up an HTTP Server, which will cover at the end. We will setup a nginx server.

    STEP 1:
       Simplify our main.html even further by introducing ng-view tag. Move the rest of the functional aspects into separate view html files and controllers.


    Step 2:
      Create a listDevices.html which will instantiate the ng-controller & uses ng-repeat to show the devices


    Step 3:
       Lets work on the controller to call our deviceModule & populate our model $scope with the list of devices. Lets also create a route which maps a controller to a view.


    By the end of this you should have the same app in Lesson-1, but much more structured and modular. The service module abstracts our device Items, we split our html into multiple views which can be managed via routes.

    But to make all this work, we need a http server setup that can run our app. The basic steps are listed below.


    1. install ngnix on your machine: brew install nginx
    2. start nginx
    3. If you go to http://localhost:8080 you should see "Welcome to nginx"

    Next we need to make sure nginx is pointing to our angular app directory, so it can serve all our assets. But first where is the nginx config file located? Depending on your installation.... In my case it is in /opt/local/etc/nginx/nginx.conf or /usr/local/etc/nginx/nginx.conf

    You have to do sudo to edit this config & save it.

    Lets tell nginx to listen on port 80 and serve files from our app directory. The below location config entry tells nginx to serve from your app directory, when you enter http://localhost/cotd


          #snip other entries
          server {
            listen       80;
            server_name  localhost;

            location / {
                root   share/nginx/html;
                index  index.html index.htm;
            }
            location /cotd {
                alias /Users/username/angular/cotd/;
                index  main.html;
            }
            #snip other config entries


    But, one problem I see is that the styles are all bad. Looks like the bootstrap CSS file is not being served. To fix this lets create an assets directory and copy the bootstrap files into the assets directory.

    Now if you do http://localhost/cotd  everything looks good.

    You can also get the latest code by doing:

    git checkout v1.2

    This should show you the assets directory with bootstrap files in it. If you have configured the nginx server as described above you should be able to see the simple device listing with bootstrap styling at http://localhost/cotd


    Saturday, April 20, 2013

    Lesson 1: Angularjs Tutorial and Learning Journey - Construct a basic Angularjs app

    Lesson - 1 Angularjs Tutorial a Learning Journey

    Angularjs is a relatively new javascript framework for developing single page architectures. You can read more about it here. I would like to document my learning journey here mainly to make sure I can review it later on & in case it can help some other poor soul. I am taking a deliberate, slow approach and learning on the go. I am no expert so take this as you may, IF you are reading this.

    Step 1: Setup our development environment

    A single page application requires a number of components to be fully functional. On the client side, we will be using AngularJS, on the server side we will be using Node, the database will be MongoDB. We will also be using a lot of cutting edge javascript frameworks on both client & server for object relational mapper (mongoose), building REST services using express on node, Karma & Mocha for unit testing. 

    An essential part of development is to use a source control system. We will use the popular git & github capabilities. This tutorial series is going to help (me mainly) us in slowly building a full application stack and also a robust development framework. We will be going through a lot of git commands, so read up on it here.
    My Setup: (pre-req, establish your github account)
    1. Mac OSX 10.8.4
    2. Install mac stand-alone CLT command line tools (mountain lion) 
    3. install homebrew - brew is an excellent package manger for osx, similar to apt-get in linux. Run the following command at your terminal prompt to install brew:
      1. ruby -e "$(curl -fsSL https://raw.github.com/mxcl/homebrew/go)"
    4. brew doctor 
      1. to ensure there are no errors 
    5. brew install git 
      1. git is the source code version control system
      2. git --version -- test to see if git was installed successfully
    6. brew install node
      1.  node --version -- test node and npm (node package manager)
      2.  npm --version
    7. MongoDB
      1. brew update
      2. brew install mongodb
      3. mongod&
      4. mongo
    8. Install nginx
      1. brew install nginx
      2. http://localhost:8080 should verify if the installation was successful
    9. Install sublime text editor
    git commands 
    1. mkdir -p $HOME/angular-projects/test-git
    2. cd angular-projects/test-git
    3. touch readme
    4. git init   --- initializes the directory to be git managed
    5. git add readme  --- adds readme created in step 5 to git
    6. git commit -m "whoppa"  
    7. git remote -v (list all remote repositories)
    8. git remote add  -- this will establish a remote repository in github. follow the setup instructions above
    9. git remote rm
    10. // git push [alias] [branch]
      1. git push origin master

    Now that you have git[hub] up and running lets do some coding.

    Working versions of the code for this project is @ https://github.com/sunkay/cotd.git

    Sample Application 

    We will be building a simple app that is a practical need I encountered at my work. "A way to list all the devices we have and establish a check-in/check-out process." We have a limited number of devices and need an ability to version control the devices in the queue.

    Here is a map of what we want the app to do. This will be a step by step process as we develop an angular based application.
    • Device CRUD (Create, Read, Update, Delete)
      • ListDevices
        • List all device assets
      • Create (addDevice)
        • Name, Asset Tag, category (phone, tablet, laptop), details (android, OSVersion etc ), Owning Group (QA, Dev), Image URL, availability (Default: Yes)
      • Update Device data
      • Delete Device
    • checktoutDevice
      • Name, CorpId, Date, Time, Device
      • Device.available = No
    • checkinDevice
      • device.available = Yes
    • report: list of people with devices
    • report: list of available devices by category

    Angular here we come ~:-) 

    Lets create a simple angular project for our new app. 

    The best way to check this out is to download a git tag:
    1. cd $HOME/angular-projects
    2. git clone https://github.com/sunkay/cotd.git
    3. it should create a directory named cotd
    4. cd cotd
    5. git checkout v1.0
      • checkout using tags (v1.0, v2.0 etc) is being used to version control the lessons. You can go to any lesson and build upon the base using these tags. 

    Angular Concepts

    Angular projects all begin by defining ng-app. This tells angular which portion of the html should be controlled by angular. In our case the entire app is angular based. Angular implements two-way binding which is very slick and reduces a ton of code that we need to write to make everything work. The two-way binding also makes sure updates are reflected automatically, by re-rendering the DOM when the model changes. Read more about angular here.

    main.html: (code is shown below)

    • We create a basic angular app denoted by ng-app. This will start the angular process to treat this as an angular app and start the goodies
    • We define a controller ng-controller='deviceListController" which lists a table of devices with attributes
    • It uses ng-repeat to create a list of devices
    • Fairly straightforward stuff so-far
    • Script Tags are included at the bottom of the main HTML file 

    cotd.js: (code is shown below)

    1. This is the controller which creates a simple static data & adds them to $scope so that it is available in the template

    Code: main.html & cotd.js
    -- --

    RUNNING THE APP: 
    In your web-browser address bar type: file:///Users/your-username/angular/cotd/main.html#

    Very simple steps so far. I am sure I will add more explanations to this as we go along. 

    This concludes our initial leg of the journey. We setup our environment, we created a git-hub account,  learned some git commands, created a brand new angular app which works!!! Woo Hoo.....